Building a Todo List application is a great way to learn about Spine, and Spine’s conventions. It’s a simple enough app, but contains enough interesting problems to be useful, such as binding, persisting model data and template rendering.
Indeed Addy Osmani has an excellent project curating the various Todo examples for the different frameworks so they can be easily compared. From the site:
TodoMVC is a common set of JavaScript examples for MVC frameworks like SproutCore, JavaScriptMVC, Backbone, YUILibrary, Spine, Sammy, AngularJS and others.
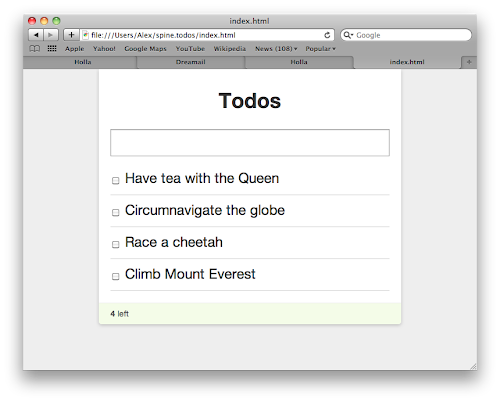
Some of the source will be omitted for the sake of brevity (such as the CSS). You can find the complete source on GitHub, as well as a live demo. This is what we’ll end up with:
So let’s think about what we need from a high level architectural standpoint.
- A
Taskmodel to store and persist tasks - A way of creating tasks
- Listing tasks
- Editing existing tasks
- Completing tasks
- Deleting tasks
Basically your classic CRUD methods. Let’s get started!
Index
The first step is to setup the basic application dependencies, which in this case will be: JSON2, jQuery, jQuery.tmpl and Spine. These will be loaded in our main (and only) HTML file, index.html:
<!DOCTYPE html>
<html>
<head>
  <title>Todos</title>
  <link rel="stylesheet" href="css/application.css" type="text/css" charset="utf-8">

  <script src="lib/json2.js" type="text/javascript" charset="utf-8"></script>
  <script src="lib/jquery.js" type="text/javascript" charset="utf-8"></script>
  <script src="lib/jquery.tmpl.js" type="text/javascript" charset="utf-8"></script>
  <script src="lib/spine.js" type="text/javascript" charset="utf-8"></script>
  <script src="lib/spine.local.js" type="text/javascript" charset="utf-8"></script>

  <script src="lib/application.js" type="text/javascript" charset="utf-8"></script>
</head>
<body>
  <!-- ... -->
</body>
</html>
Our application is going to be located in application.js. Since it’s going to be very small (only two controllers), we could probably get away with just putting it in one file.
Application HTML
Now let’s take a look at our application’s static HTML. We’re going to need a <form> for creating new tasks, a <div class="items" /> for listing the actual tasks, and a footer containing some operations, such as clearing completed tasks, and showing some stats:
<div id="views">
  <div id="tasks">
    <h1>Todos</h1>

    <form>
      <input type="text" placeholder="What needs to be done?">
    </form>

    <div class="items"></div>

    <footer>
      <a class="clear">Clear completed</a>
      <div class="count"><span class="countVal"></span> left</div>
    </footer>
  </div>
</div>
So far so good. Now in order to tie this into our Spine app, we’re going to have to go back to the fundamentals, the Task model.
Task model
So the Task model is remarkably straightforward. Firstly a task has two attributes, a name and a done status that indicates whether it’s been completed. These attributes are passed to configure(), as you can see in the example below:
//= CoffeeScript
class Task extends Spine.Model
  @configure "Task", "name", "done"

  # Persist with Local Storage
  @extend Spine.Model.Local

  @active: ->
    @select (item) -> !item.done

  @done: ->
    @select (item) -> !!item.done

  @destroyDone: ->
    rec.destroy() for rec in @done()

//= JavaScript
var Task = Spine.Model.sub();

Task.configure("Task", "name", "done");

// Persist with Local Storage
Task.extend(Spine.Model.Local);

Task.extend({
  active: function(){
    return this.select(function(item) {
      return !item.done;
    });
  },

  done: function(){
    return this.select(function(item) {
      return !!item.done;
    });
  },

  destroyDone: function(){
    var items = this.done();
    for(var i=0; i < items.length; i++)
      items[i].destroy();
  }
});
The model is being extended by Spine.Model.Local which automatically persists Task records to HTML5 Local Storage, so they’re saved between page requests.
We’ve then got some static methods, active() and done(), which return an array of unfinished and finished tasks respectively.
Finally we have a static destroyDone() function, that iterates over all the tasks with a true done attribute, destroying them. This will be the function called when the ‘Clear completed’ link in the HTML is clicked.
Application controller
So let’s look at the core of the application’s logic, the controllers. Since each task has a fair bit of logic associated with it, such as edit in place, we’re going to use the element controller pattern.
In other words, we’re going to have one controller, TaskApp, which will be in charge creating new tasks, and rendering the initial task list. Then we’ll have another controller called Tasks, instances of which will be associated with an individual Task record. Tasks instances will be in charge of editing, updating and destroying their associated task.
To keep thing simple, we’ll keep things ‘read-only’ at the moment, and won’t provide any functionality for creating, editing or deleting tasks:
//= CoffeeScript
class TaskApp extends Spine.Controller
  elements:
    ".items": "items"

  constructor: ->
    super
    Task.bind("create",  @addOne)
    Task.bind("refresh", @addAll)
    Task.fetch()

  addOne: (task) =>
    view = new Tasks(item: task)
    @items.append(view.render().el)

  addAll: =>
    Task.each(@addOne)

//= JavaScript
var TaskApp = Spine.Controller.sub({
  elements: {
    ".items": "items"
  },

  init: function(){
    Task.bind("create",  this.proxy(this.addOne));
    Task.bind("refresh", this.proxy(this.addAll));
    Task.fetch();
  },

  addOne: function(task){
    var view = new Tasks({item: task});
    this.items.append(view.render().el);
  },

  addAll: function(){
    Task.each(this.proxy(this.addOne));
  }
});
You can see we’ve got a couple of things going on, an elements object, a constructor function, and several instance functions. Let’s take a look at that elements hash first.
On the left of the elements hash (i.e. the key) is a DOM element selector. The value of the hash is just a string, "items". Spine takes this elements hash, and populates local variables pointing to the DOM elements. In this case, Spine will create a items variable, pointing to any element that matches the .items selector, which here will be the <div class="items" /> element, defined in the HTML section earlier.
In a nutshell this means we can now refer to this.items in our controller, which points to the <div class="items" /> element. As you can see, we’re refering to items in the addOne() function, appending a element to it.
Now let’s take a look at the constructor function. It’s binding to several events on the Task model, such as create and refresh. Since we’re delegating handling of updates and deletes to the Tasks controller, we don’t need to to worry about that here. The two pieces of logic are:
When a new task is created, the create event will be fired, calling
addOne()which instantiates theTaskscontroller, rendering it and appending the resultant element tothis.itemsWhen a refresh event is called (i.e. the tasks have been loaded from Local Storage),
addAll()will be called. This function iterates over all the tasks, passing them toaddOne().
For more in-depth explanations of controllers, see the controllers guide.
Task item controller
Ok, let’s look at the last bit, the Tasks controller. This will be in charge of individual Task records, making sure the view updates then the task does. It’s super simple, only about a dozen lines long:
//= CoffeeScript
class Tasks extends Spine.Controller
  constructor: ->
    super
    @item.bind("update",  @render)
    @item.bind("destroy", @remove)

  render: =>
    @replace $("#taskTemplate").tmpl(@item)
    @

  remove: =>
    @el.remove()

//= JavaScript
var Tasks = Spine.Controller.sub({
  init: function(){
    this.item.bind("update", this.proxy(this.render));
    this.item.bind("destroy", this.proxy(this.remove));
  },

  render: function(){
    this.replace($("#taskTemplate").tmpl(this.item));
    return this;
  },

  remove: function(){
    this.el.remove();
    this.release();
  }
});
In the constructor, we’re setting up listeners to the update and destroy events, calling render() and remove() respectively. In other words, when the task updates, we want to re-render the view to reflect its changes. Likewise, when the task is destroyed, we want to remove the view.
You’ll notice that the this.item variable is never defined. It’s actually passed as a property when the Tasks class is instantiated, back in the TaskApp controller; Spine sets all options passed to controllers as local variables.
In the render() function we’re rendering a jQuery.tmpl JavaScript template, called #taskTemplate. This returns a piece of HTML that we’re using to replace the controller’s current element. In other words, the rendered template is now present under this.el, and can be appended to the tasks list.
Template
The #taskTemplate used in the Tasks controller needs defining, so let’s do that. One way of including templates in the page is by using custom script tags. These don’t get evaluated by the browser, which just interprets them as plain text. jQuery.tmpl can then access the templates, rendering pieces of HTML.
<script type="text/x-jquery-tmpl" id="taskTemplate">
  <div class="item {{if done}}done{{/if}}">
    <div class="view" title="Double click to edit...">
      <input type="checkbox" {{if done}}checked="checked"{{/if}}>
      <span>${name}</span> <a class="destroy"></a>
    </div>
  </div>
</script>
The template tags demonstrated above, such as {{if done}}, are specific to jQuery.tmpl, and documented on jQuery’s site. In your own applications, you have a choice of template libraries, such as jQuery.tmpl, Mustache, or Eco. Use whichever you prefer, Spine doesn’t mind.
Now when $("#taskTemplate").tmpl(this.item) is called in the Tasks controller our template will render correctly.
Setup
So now we have two controllers: TaskApp and Tasks. The former needs to get instantiated when the page loads, so some code actually gets run. You can do this simply enough, by using jQuery’s ready() utility, which will execute a function when the DOM’s loaded.
//= CoffeeScript
jQuery ($) ->
  new TaskApp(el: $("#tasks"))
Then we’re instantiating TaskApp, setting it’s internal element (el) to the main #tasks div.
In action
Now we’ve gone far enough without checking that things work as they should. Open up index.html and, if everything’s going to plan, you shouldn’t see any errors in the console. The task list will be blank (we haven’t created any tasks yet), and the form won’t work, as we haven’t yet hooked it up. However, we can create a Task from the console.
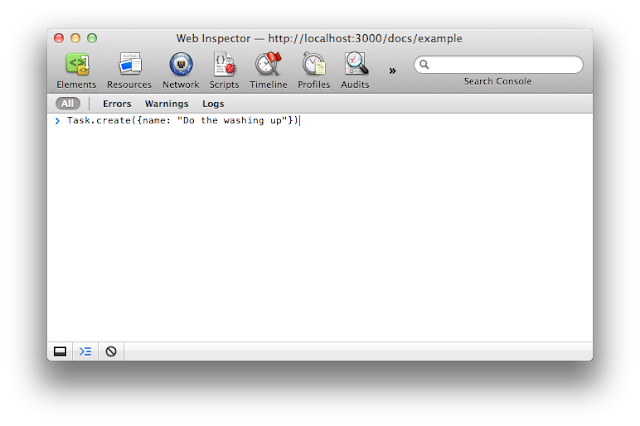
Once you’ve run the above in the console, we should be looking at a brand new task in the list of tasks. Notice that if you refresh the page, the task still persists using Local Storage.
Creating new tasks
It’s all very good creating tasks from the console, but we can hardly expect our users to do that. Let’s hook up the task creation form to provide a better interface. All the HTML is already there (in index.html); all we have to do is add some event listeners to that form, creating some tasks.
//= CoffeeScript
class TaskApp extends Spine.Controller
  # Add event listeners
  events:
    "submit form":   "create"
    "click  .clear": "clear"

  # Create some local variables refering to elements
  elements:
    ".items":     "items"
    "form input": "input"

  constructor: ->
    super
    Task.bind("create",  @addOne)
    Task.bind("refresh", @addAll)
    Task.fetch()

  addOne: (task) =>
    view = new Tasks(item: task)
    @items.append(view.render().el)

  addAll: =>
    Task.each(@addOne)

  create: (e) ->
    e.preventDefault()
    Task.create(name: @input.val())
    @input.val("")

  clear: ->
    Task.destroyDone()

  //= JavaScript
  var TaskApp = Spine.Controller.sub({
    events: {
      "submit form": "create",
      "click  .clear": "clear"
    },

    elements: {
      ".items": "items",
      "form input": "input"
    },

    init: function(){
      Task.bind("create",  this.proxy(this.addOne));
      Task.bind("refresh", this.proxy(this.addAll));
      Task.fetch();
    },

    addOne: function(task){
      var view = new Tasks({
        item: task
      });
      this.items.append(view.render().el);
    },

    addAll: function(){
      Task.each(this.proxy(this.addOne));
    },

    create: function(e) {
      e.preventDefault();
      Task.create({name: this.input.val()});
      this.input.val("");
    },

    clear: function(){
      Task.destroyDone();
    }
  });
So you can see we’ve added two new functions to TaskApp, create() and clear(). There’s also a new property called events.
What the events property does is add events onto the controller’s element. It’s in the form of {"eventName selector", "callbackName"}. In this case we’re adding a submit event onto the task creation form, invoking create() when the event triggers.
In the create() function, we’re creating a new task with a name set to the text input’s value.
We’re also listening for a click event on the <a class="clear" /> element, which will call clear(), deleting all the tasks that have been completed.
In action
Now refresh index.html to see the fruits of our labour. We should be able to type a task name, and press return to submit the form, creating a new task.

Excellent, we’re making great progress, but how about completing and deleting tasks?
Completing & deleting tasks
So the last part of our tutorial is going to cover completing and deleting tasks. These two actions are specific to each Task item, so we need to add this functionality to the Tasks controller.
//= CoffeeScript
class Tasks extends Spine.Controller
  events:
   "change   input[type=checkbox]": "toggle"
   "click    .destroy":             "destroyItem"

  constructor: ->
    super
    @item.bind("update",  @render)
    @item.bind("destroy", @release)

  render: =>
    @replace($("#taskTemplate").tmpl(@item))
    @

  toggle: ->
    @item.done = !@item.done
    @item.save()

  destroyItem: ->
    @item.destroy()

//= JavaScript
var Tasks = Spine.Controller.sub({
  events: {
    "change input[type=checkbox]": "toggle",
    "click  .destroy": "destroyItem"
  },

  init: function(){
    this.item.bind("update", this.proxy(this.render));
    this.item.bind("destroy", this.proxy(this.destroy));
  },

  render: function(){
    this.html($("#taskTemplate").tmpl(this.item));
    return this;
  },

  toggle: function(){
    this.item.done = !this.item.done;
    this.item.save();
  },

  destroyItem: function(){
    this.item.destroy();
  }
});
So, the key part of this is the two event handlers we’ve added, a change event on the task’s checkbox, and a click event on the task’s <a class="destroy" /> link.
The checkbox’s change event invokes the
toggle()function, which toggles the tasks’sdonestatus, then resaving the task - very straightforward!The link’s click event invokes
destroyItem(), which simply destroy the task.
That’s all there is to it. Since we’re binding to the update function, whenever the task changes the view will automatically be re-rendered, checking or un-checking the checkbox as appropriate. Similarly, when the task is destroyed, the controller’s destroy() function will be called, removing the task from the view.
This tutorial is long enough as is, so we won’t go into in-place editing or updating. If you want an example of that, see the full source.
Next steps
So this tutorial should have given you a good overview of Spine, and basic architecture techniques. Next you may want to brush up on some of Spine’s API, by viewing the controllers or models guides, or perhaps look at the next example, how to build a contacts manager.